Best Cable Lock for Trail Cameras Made Simple: A Clear Buying Guide for 2026
Disclosure: We may earn a commission when you buy through links on this page, at no extra cost to you. As an Amazon Associate I earn from qualifying purchases. Learn more

Cable locks for trail cameras compared by thickness, length, lock head and weather sealing, with simple setup steps for beginners.
Setting out a trail camera is exciting right up until you remember it will sit alone in the woods for weeks, visible to anyone who walks past. A cable lock is the simple fix. If this is your first purchase, the best cable lock for trail cameras is simply the one that fits your camera, wraps your tree, and resists the tools a casual thief actually carries.
This guide starts with the basics, explains each spec in plain English, and ends with a setup routine you can follow on your first trip out. The comparison table below shows the main lock styles side by side.




Cable Locks 101: The Basics
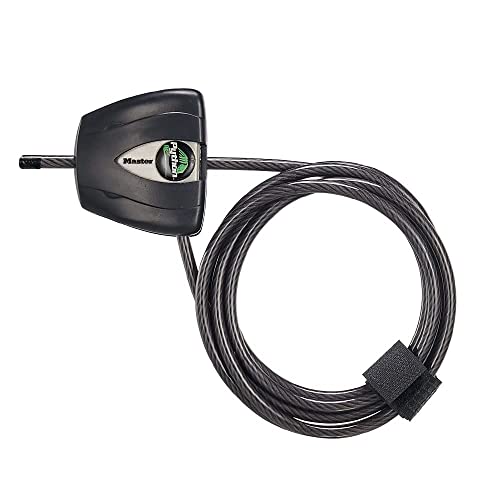
A cable lock for a trail camera is a flexible steel cable with a locking head. You thread the cable through the locking holes or slots on your camera housing, wrap it around a tree or post, and click or key the ends together. The cable does two jobs. It stops someone from simply carrying the camera away, and it holds the camera firmly at the angle you set, even in wind or when curious animals nudge it.
Most designs use a braided steel core inside a plastic or vinyl coating. The coating protects your camera finish and the tree bark, and it keeps the cable quiet against the housing. Locking heads come in two broad types: key locks, which are simple and cheap, and combination or cam lock styles that use a small barrel lock. Sizes are described by cable length, usually around 5 to 8 feet, and by cable thickness, often shown as a fraction of an inch.
Key Specs Explained in Plain English
Features That Matter for Trail Cameras
Trail camera use is rough use, so a few features matter more than they would for a bike or a gate. Your lock must thread through the small locking slots on the camera body, so check that the cable end, called the tip, is slim enough for your model. It also needs enough length to circle a real tree, not a sapling, and a coating that will not crack in winter cold. Pairing the lock with one of the best trail cameras that has generous locking slots makes setup far easier.
Cable Thickness and Cut Resistance
Thickness is your main defense. Thin cables around 1/4 inch stop honest people and slow everyone else, while cables around 5/16 to 3/8 inch force a thief to bring serious cutting tools and spend noisy minutes at your tree. Braided steel resists bolt cutters better than a single solid strand because the strands spread the cutting force. For public land or any spot near a road, choose the thicker end of the range and accept the small weight penalty.
Locking Mechanism and Key Access
The locking head is the part thieves attack and weather corrodes, so it deserves attention. A covered keyway keeps grit and ice out of the mechanism, and a lock that clicks positively tells you it is fully engaged before you walk away. Buy a lock that includes at least two keys, store one at home and one in your vehicle, and write the key number in your phone. Combination styles remove the lost key problem but can be fiddly with cold or gloved fingers.
Durability and Weather Sealing
Your lock will live outdoors through rain, frost, and summer heat, so weather sealing decides how long it stays usable. Look for a vinyl or rubber coated cable with sealed ends, because water that enters the braid rusts it from the inside. Stainless or zinc treated hardware at the lock head slows corrosion at the most exposed point. A lock that still opens smoothly after a wet autumn is worth more than a slightly thicker cable on a head that seizes by spring.
Length and Fit Around Trees
Length is a fit question, not a strength question. A 5 foot cable suits small to medium trees, while an 8 foot cable handles wide trunks and lets you lock to a sturdy tree set back from the trail. Too much spare cable is not harmless, though. Loose loops give a thief slack to work with and let the camera shift in wind. Measure the trees where you scout, using a tape or a length of cord, and buy the shortest cable that wraps your typical trunk with a few inches to spare.
Using a Lock in Low Light
You will often set or check cameras at dawn or dusk, so small usability details matter. A lock head with a large, textured release is far easier to work with gloves and a headlamp than a tiny smooth button. Bright tape on your key and a lanyard on the lock head reduce drops into leaf litter. Cellular models from our guide to the best cell trail cameras reward this care, since a well locked camera can send you an alert photo if someone tampers with it.
Rookie Mistakes to Avoid
- Buying on price alone and ending up with a cable so thin that household cutters slice it in seconds.
- Never test fitting the cable through the camera locking slots at home, then discovering the mismatch in the field.
- Locking to a small, dead, or bendy tree that a thief can cut or shake faster than the cable itself.
- Hanging the camera at eye level on a main trail, advertising it to every passerby instead of tucking it off the path.
- Forgetting that a lock protects the camera body only, while the memory card door may still open unless the housing design blocks it.
Getting Started: Setup and First Use
Start at home. Thread the cable through your camera, practice locking and unlocking it on a chair leg, and set the camera angle you want so you are not learning in the dark. Fit fresh batteries before you leave, and our guide to the best batteries for trail cameras explains which types last longest in cold weather. Wipe the lens with a lens cloth, not your shirt, since grit on fabric scratches coatings.
At the tree, mount the camera about waist to chest height, angled slightly down toward the trail or feeding area. Wrap the cable snugly, lock it, then tug firmly and try to rotate the camera. If it moves, tighten the wrap or add a small wooden wedge behind the housing. Take a test photo by walking past, check the framing, and note the lock key number and GPS point in your phone before you leave.
Frequently Asked Questions
What features matter most in a cable lock for trail cameras?
Cable thickness, a weather sealed lock head, and a tip that fits your camera slots matter most. Together they decide whether the lock resists cutting, survives the season, and actually goes on the camera without a fight. Length comes next. Buy for the trees you really use, and treat coating quality as a bonus that protects both bark and housing.
What specs matter most for beginners?
Beginners should focus on three numbers: cable thickness around 5/16 inch, length around 6 to 8 feet, and a keyed lock with two keys included. Those specs cover most trees and most risk levels without overspending. Ignore exotic claims about exotic alloys. A standard braided steel cable, fitted snugly and checked each visit, protects a first camera very well.
What do cable length and thickness numbers mean?
Length tells you the largest tree the cable can circle, and thickness tells you how hard the cable is to cut. An 8 foot cable wraps a trunk of roughly 2.5 feet across with room for the lock, while a 5/16 inch cable refers to the steel core diameter under the coating. When a listing shows only the coated diameter, expect the steel inside to be a little thinner.
Is a cable lock enough on its own, or do I need a lock box?
A cable lock is enough for private land and low traffic areas, where the main risk is a casual passerby. On public land, a steel lock box lag bolted to the tree adds a second barrier that also guards the card door and buttons. Many hunters use both, and the pairing still costs less than replacing one camera. If your camera watches a home or barn, compare setups in our guide to the best trail cameras for security.
Which lock style is easiest to use in low light?
A keyed lock with a large head and a covered keyway is easiest in low light, because you can work it by feel with gloves on. Combination dials demand light and bare fingers to read small numbers. A simple field trick helps either style: keep the key on a bright lanyard and use your headlamp red mode so you do not spook game while you work.
How much should I spend on my first cable lock?
Spend around $15 to $30 on your first cable lock. That range buys a braided cable of useful thickness, a coated finish, and a lock head that survives weather. Very cheap locks under around $10 often skimp on the lock head, which is the part that fails first. If you run several cameras, including any from our guide to the best wifi trail cameras, buying matched locks that share one key saves real time in the field.
Our Verdict
Fit the cable to your camera, choose real thickness, and mount the setup out of easy sight. Those three habits protect your camera better than any single premium feature. Check your shortlist against the product table above, and you will own the best cable lock for trail cameras for your land, your trees, and your budget.