Best Backpacking Cookware Sets: Types Compared and How to Choose for 2026
Disclosure: We may earn a commission when you buy through links on this page, at no extra cost to you. As an Amazon Associate I earn from qualifying purchases. Learn more

Best backpacking cookware sets compared by type, with each type's pros, cons, ideal users, and price range, so you can choose the right style.
Backpacking cookware comes in so many materials and set sizes that first time buyers often freeze at the comparison stage. Sorting out the best backpacking cookware sets gets easier when you compare types first, because material decides weight, durability, and how your food actually cooks on a small stove.
This guide compares the main types honestly, including where heavy home kitchen materials do and do not make sense outdoors. The comparison table below gives a fast overview, and the sections after it explain how to choose with your stove, group size, and menu in mind.




Types of Backpacking Cookware Sets Compared
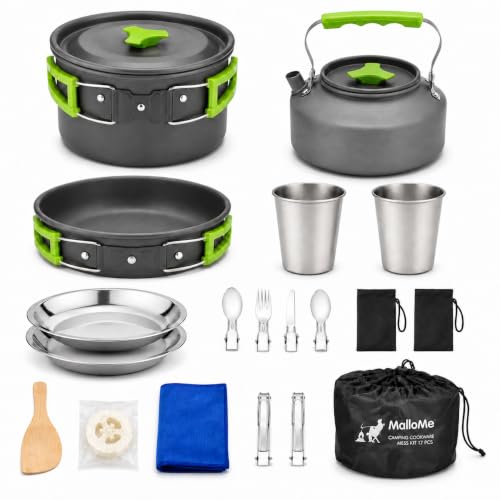
Think of the types on a spectrum from lightest to toughest. Hard anodized aluminum and nonstick sets dominate true backpacking because they keep pack weight low. Carbon steel and cast iron appear in camp kitchens too, but mainly where a vehicle carries the load. Price follows a similar pattern, from around $25 for a basic aluminum set to around $120 or more for large and durable kits.
Carbon Steel Pans
Carbon steel pans heat quickly, sear well, and build a natural nonstick surface through seasoning with oil over time. They weigh far less than cast iron but far more than aluminum, so they suit car camping and base camps rather than long trail days. A carbon steel pan rewards cooks who fry eggs, pancakes, and fresh fish at a roadside site. Maintenance is the catch: dry the pan fully after washing and wipe it with a thin layer of oil, or rust will start. If your trips are mostly on foot, treat carbon steel as a specialty piece, not the core of your backpacking set.
Cast Iron Cookware
Cast iron cookware holds heat better than any other camp material, which makes it superb for steady simmering and baking over coals. It is also the heaviest option by a wide margin, and a single skillet can weigh more than a complete aluminum backpacking set. For that reason cast iron belongs at car campsites, cabins, and short walk in sites, not in a pack carried for miles. Its strengths are real: it lasts for decades, improves with seasoning, and never warps. Choose it when the vehicle does the carrying and cooking is the center of the trip.
Hard Anodized Aluminum
Hard anodized aluminum is the workhorse material of backpacking cookware sets. The anodized surface is tough, resists scratches better than plain aluminum, spreads heat reasonably well, and keeps weight low enough for multi day trips. Pots in this material boil water fast and handle sauces and one pot meals without fuss. It is not truly nonstick, so eggs and pancakes need oil and a watchful eye. Typical sets nest together with lids that double as small pans, and prices around $40 to $90 cover most solo and two person needs. For most backpackers, this type is the sensible starting point.
Nonstick Cookware
Nonstick cookware sets pair a light aluminum body with a slick coating that releases food and wipes clean with very little water, a real gift at dry campsites. They suit beginners and anyone cooking sticky foods like eggs, cheese, and sauces on a gentle flame. The limits are durability and heat: coatings scratch, wear out in a few seasons, and dislike empty preheating on a roaring stove. Use wooden or silicone utensils and keep the flame moderate. Expect to pay around $35 to $80, and budget for eventual replacement as part of the deal.
Material lessons from home kitchens carry over here in part. Our guide to the best stainless cookware sets explains heat control and sticking in detail for readers who also cook with steel at home.
Carbon Steel Pans vs Cast Iron Cookware: Which Should You Choose?
Choose carbon steel if you want strong searing with less weight and faster heating. It heats and cools quickly, which gives you control on a camp stove, and a well seasoned surface releases most foods. Choose cast iron if steady heat matters most, for example for cornbread, stews, or frying over coals, and if carrying weight is not your problem. On durability both can last for decades with seasoning care, but carbon steel rusts faster when neglected because it is thinner. On price, a single pan of either type often costs around $25 to $60. For backpacking on foot, honestly, neither wins: both lose to hard anodized aluminum on weight, and that verdict shapes the rest of this guide.
How to Choose the Right Backpacking Cookware Set
Nonstick Coating Safety (PTFE, PFOA Free, Ceramic)
Modern nonstick coatings sold for cookware are PFOA free, meaning the coating is not made with that chemical. PTFE coatings are considered safe at normal cooking temperatures; problems begin only when a dry pan overheats far beyond food cooking ranges, which is easy to avoid by never preheating an empty nonstick pot on high flame. Ceramic style coatings avoid PTFE but tend to lose their slickness sooner. For backpacking, the practical rule is simple: keep water or food in the pot, keep the flame moderate, and retire a coating that is flaking or deeply scratched.
Material: Stainless Steel, Nonstick, Cast Iron, Carbon Steel, Copper
Each material trades heat control, weight, and care differently. Stainless steel is tough and does not react with acidic foods, but it is heavier than aluminum and can cook unevenly unless it has an added base. Nonstick is light and easy to clean but wears out. Cast iron and carbon steel sear beautifully and demand seasoning care. Copper heats superbly at home but is heavy, costly, and pointless on a trail stove. For backpacking, aluminum based sets win on weight, stainless wins on toughness for long trips, and the iron family wins only when a car carries it. Match the material to your carrying method first and your menu second.
Heat Distribution and Construction (Tri Ply, Clad, Encapsulated Base)
Small backpacking stoves produce a narrow and fierce flame, so construction decides whether your dinner scorches in the center. A thicker base spreads heat outward and reduces hot spots, while very thin pots boil water fast but burn sauces easily. At home, tri ply and fully clad pans solve this with layered metals, but that weight makes little sense in a pack. Outdoors, the practical fixes are a moderate flame, frequent stirring, and choosing pots with a visibly thicker base. A heat exchanger ring on some pots speeds boiling and saves fuel, which matters more on long trips than any clad construction.
Set Size and Pieces You Actually Need
Count pieces honestly, because makers count lids as pieces and a ten piece set may hold only four vessels. Most solo hikers need one pot of about 1 to 1.5 liters and a lid. Two people do well with a pot of about 2 liters plus a small pan for eggs or toasted bread. Groups need volume more than variety, so one large pot beats a nest of small ones. Buying pieces separately costs more per item but avoids carrying cups and bowls you never use. Before you buy, list the meals you actually cook and let that list, not the box count, set the size.
Oven Safe Temperature and Handles
Backpacking pots rarely go in an oven, but handles decide safety on a stove every day. Folding handles should lock firmly and feel cool enough to grip with a bare hand or a light bandana; thin wire handles can flex under a full pot of water. At home, oven safe ratings and riveted handles matter more, and our guide to the best kitchen cookware sets covers those checks. On the trail, test the handle with the pot full of cold water before your first trip, because a liter of water weighs about 2.2 lb and a weak handle shows itself immediately.
Setup and Care Tips
- Preheat stainless pans before adding oil. A warm pan and then oil reduces sticking when you fry at a car campsite.
- Use wooden or silicone utensils on nonstick. Metal spoons are the fastest way to kill a coating.
- Avoid thermal shock. Never plunge a hot pan into cold water, since sudden cooling can warp thin backpacking pots.
- Dry iron and steel fully. A minute over low flame after washing prevents rust better than towel drying alone.
- Nest with a cloth between pieces. A small towel stops rattling and protects coatings inside your pack. Home cooks comparing everyday sets can also see our guide to the best home cookware sets for care basics that apply in any kitchen.
FAQs
What cookware material is the safest?
Stainless steel, cast iron, carbon steel, and hard anodized aluminum are all widely regarded as safe for normal cooking. Nonstick coatings are also considered safe when used at moderate heat and replaced once they flake or wear badly. The safest choice is the one you use correctly: avoid overheating empty coated pans, keep iron seasoned and dry, and retire damaged coatings. No material compensates for burnt food and a scorched pot.
How do I know if a pan works on induction?
Hold a magnet to the base of the pan. If the magnet sticks firmly, the pan will work on an induction hob at home. Many aluminum backpacking pots fail this test, which does not matter on a gas trail stove but does matter if you hoped to use the set in your kitchen too. Stainless sets with a magnetic base pass most often. Check before you buy if dual use at home is part of your plan.
Why do foods stick to stainless steel pans?
Food sticks when the pan is too cool, too dry, or crowded. Proteins bond to the metal until they cook enough to release, which is why a properly heated pan frees eggs and fish after a minute or two. Heat the pan first, add oil, then add food, and resist moving it too soon. For backpacking pots, the same logic applies on a stove: steady moderate heat and patience beat a maximum flame every time.
How long does nonstick cookware last?
A backpacking nonstick pot used with care typically lasts about two to four seasons of regular trips. Lifespan drops fast with metal utensils, maximum flames, and abrasive cleaning. Once the coating looks dull, scratched through, or begins to flake, replace the piece rather than nursing it along. Hard anodized aluminum without a coating lasts far longer, which is why frequent hikers often accept a little more sticking in exchange for a pot that survives a decade.
Is it better to buy a cookware set or individual pieces?
A set is better when its nesting design matches your group size, because the pieces pack into one compact bundle at a lower total price. Individual pieces are better when you have unusual needs, such as one very large pot for group trips plus a tiny solo pot. Many hikers start with a two person set and add a single large pot later. Judge by packed size and the meals you cook, not by the piece count printed on the box.
Can backpacking cookware sets go in the oven?
Most cannot, because folding handles, plastic grips, and coatings have low heat limits. A plain stainless or aluminum pot without plastic parts may tolerate a moderate oven at home, but check the maker limits first and never guess. On the trail the question rarely matters, since stoves and campfires do the heating. If home oven use matters to you, keep a separate home set and let your backpacking kit stay light and simple.
Final Thoughts
Start with carrying method, then material, then set size. On foot, hard anodized aluminum or a careful nonstick set will serve you best; by car, steel and iron become realistic treats. Revisit the product table above with your stove and group size in mind, and the best backpacking cookware sets for your style of trip should stand out clearly.