Best Cameras for Moon Pictures in 2026: Which Type Is Right for You?
Disclosure: We may earn a commission when you buy through links on this page, at no extra cost to you. As an Amazon Associate I earn from qualifying purchases. Learn more

Learn how to choose cameras for moon pictures by comparing types, optical zoom, sensor size and controls, plus setup tips for sharp and clear results.
The moon looks huge to your eyes and tiny in most photos, and that gap explains the confusion when you shop. The best cameras for moon pictures solve it with reach, because the moon fills the frame only when a lens can magnify a distant subject. This guide compares each camera type by that job, so you can read the comparison table below clearly.
Every type below can record the moon, but they differ in detail, cost and effort. A simple model may suit a bright full moon over a skyline, while crater detail asks for more reach and control. Match the type to the picture you picture first, and the other choices get easier.




Camera Styles for Lunar Photography
Start with the shape of the camera, because shape decides which lenses you can use and how far the system can magnify the moon. For general family and travel use, see our guide to the best cameras for pictures.
Mirrorless Bodies With Telephoto Lenses
A mirrorless camera uses interchangeable lenses and a large sensor. With a telephoto lens of about 400 mm or longer, it records the finest crater detail and gives full manual control over focus and exposure. Choose it if you plan to grow into night sky work and print large. The catch is cost and weight, because the lens often costs more than the body.
Superzoom Bridge Cameras
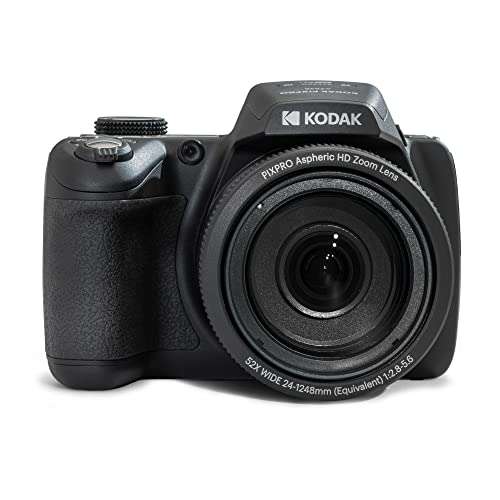
A bridge camera has one fixed lens with a very long optical zoom, often reaching the equal of 1200 mm to 2000 mm on a full frame camera. The moon can fill much of the frame with no lens swaps, so this is the simplest route to close views. Its small sensor limits fine detail in dim light around the moon. Choose it if you want reach first and accept softer files.
Compact Superzoom Cameras
A compact superzoom fits a long zoom lens into a body that slips into a coat pocket. Typical reach runs to the equal of about 600 mm to 1000 mm, enough for a pleasing moon disc and clear phase shapes. You give up some detail and manual control compared with a bridge model. Choose it if you travel light and shoot the moon within a wider scene.
Action Cameras and Vlogging Cameras
Action cameras and vlogging cameras use wide lenses made to capture a room, a trail or a face up close. That wide view is the wrong tool for the moon, which shrinks to a small bright dot with no surface detail. These types still serve a moonlit hike where the moon is only one element. Do not buy one as your main moon camera, because a crop cannot restore detail the lens never recorded.
Mirrorless Cameras vs Superzoom Bridge Cameras: Which Should You Choose?
These two types lead for moon work, and they split on detail versus simplicity. A mirrorless setup wins on sensor size, lens quality and editing room in RAW files, so it suits shooters who refine each image later. Readers weighing broader options can see our guide to the best digital cameras for general use.
A bridge camera wins on reach per dollar and on ease, because one lens covers the whole zoom range with no swaps in the dark. Choose the bridge type for strong views on your first clear night. Choose mirrorless if you own long lenses or plan to build a system.
Key Features to Compare
Reach comes first, but the factors below decide how much of it becomes a sharp picture.
Optical Zoom and Focal Length Reach
Focal length decides how large the moon appears, and magnification grows as that number rises, so judge a camera by its longest reach rather than its zoom label. Around 400 mm on a full frame body gives a modest moon with room for a landscape, while about 800 mm to 1000 mm fills far more of the frame. Trust optical zoom only, because it uses the lens to magnify the scene. That is why the best cameras for moon pictures are judged first by honest reach.
Sensor Size and Detail When You Crop
Sensor size shapes how clean the file looks when you crop closer. A 1 inch sensor handles a bright moon well, an APS C sensor adds detail and editing room, and a full frame sensor gives the cleanest shadows beside a dark foreground. More megapixels help only when the lens is sharp, because extra pixels cannot add detail the lens blurred.
Autofocus and Manual Focus Control
Autofocus can lock onto the bright moon against a dark sky, yet it may hunt when thin cloud crosses the disc or the moon sits near the frame edge. A good moon camera lets you switch to manual focus and magnify the screen view, so you can set focus on the crater edge with care. Judge it by how easily you can override the automatic system, not by focus point count.
Image Stabilization and Tripod Support
Image stabilization steadies small hand movements at moderate reach, but shake grows with magnification and no system fully replaces solid support at very long focal lengths. Look for a firm tripod socket, a two second timer or a remote release option, and stabilization you can switch off on a tripod. A weatherproof sealed body also matters on damp nights, because dew forms fast under a clear sky. Treat stabilization as a framing helper, and the tripod as the real source of sharpness.
Video Capabilities for Moon Pictures
Some readers want footage of the moon crossing a skyline, and 4K video gives room to crop while keeping useful detail. A crop mode in video can extend your reach further, and a microphone input helps if you record narration. If you plan to mix stills and clips in one outing, see our guide to the best cameras for picture and video. For stills only, video features should never outrank reach or sensor size.
A Simple Setup Routine for Sharp Moon Pictures
Mount the camera on a tripod, turn stabilization off, and frame the moon at your longest focal length. Set a low ISO of about 100 to 400, an aperture near f/8 to f/11, and a shutter speed near 1/125 to 1/500 of a second to start. The moon is lit by full sun, so it needs a far shorter exposure than the dark sky suggests.
Focus manually on the brightest crater edge in the magnified screen view, then fire with the timer so your touch cannot shake the frame. Check edge sharpness and adjust the shutter speed one step at a time. Brighten only if the surface looks gray, and shorten the exposure if bright areas lose texture.
Common Mistakes to Avoid
- Buying by megapixels alone leaves a small moon and no detail to crop into.
- Trusting digital zoom instead of optical zoom throws away pixels and softens crater edges.
- Shooting handheld at a slow shutter speed lets tiny movements blur the moon.
- Leaving exposure fully automatic lets the camera brighten the sky and wash out surface shading.
- Ignoring haze and thin cloud dulls contrast, so a sharp lens records a flat moon.
- Packing no spare battery ends a cold session early, because batteries drain faster in low temperatures.
Care and Maintenance for Your Moon Camera
Clean the front lens element with a lens cloth, not your shirt, because grit in fabric can scratch the coating. Let a cold camera warm up inside a sealed bag when you come indoors, so moisture forms on the bag instead of inside the lens. Store it in a dry padded bag with the lens cap on.
Carry a spare battery on night outings and rotate it with the main one so both stay in use. Wipe dew from the body before you pack away, and check tripod locks for grit after use on dusty ground. A lens hood also slows dew during long waits.
FAQ
What features matter most for sharp moon pictures on a clear night?
Reach, steady support and manual exposure matter most for sharp moon pictures. One point many guides skip is timing, because the nights just before and after the full moon often show better crater shading than the full moon itself. At those phases, low angled sunlight casts shadows along the line between light and dark. Plan for that window when detail matters more than a round disc.
How much should I spend on a first camera for moon pictures?
A first camera for moon pictures can cost about $300 to $600 in bridge or compact form, while mirrorless setups with a long lens often run about $900 to $2000. Set aside part of that budget for a tripod and a spare battery, because support gear shapes results as much as the camera does. Spending first on reach within one type usually beats a larger sensor with a short lens.
Which camera type handles low light best for moon pictures?
A mirrorless camera with a full frame sensor handles low light best among these types. The moon itself is bright, so low light skill matters most for the foreground in a moonscape, such as trees, water or buildings under the disc. A larger sensor keeps those dark areas cleaner while the exposure still protects the bright surface. Bridge and compact models shoot such scenes too, but their shadows show noise sooner.
Is a smartphone enough for moon pictures?
A smartphone is enough for moon pictures you plan to share at small sizes on a screen. Recent phones stack many frames and apply heavy processing, which can produce a pleasing moon over a skyline. The limits show when you print or crop, because the tiny lens and sensor record far less true detail. Use a tripod and the timer on your phone anyway, since steady frames give the processing more to work with.
Wrapping Up
Decide by reach first, then by sensor size, then by how much gear you will carry on a cold night. A bridge camera gives the easiest close views, a compact superzoom suits light travel, and a mirrorless system rewards patience with the finest detail. Use the product table above to compare reach, sensor and price.
When you judge best cameras for moon pictures by the picture you actually want, the right type becomes clear. Pick the simplest setup that fills your frame, and spend your next clear night outside shooting.